Best Practices for Longevity, Efficiency and Safety
1. Introduction to Jenbacher Combustion Chamber
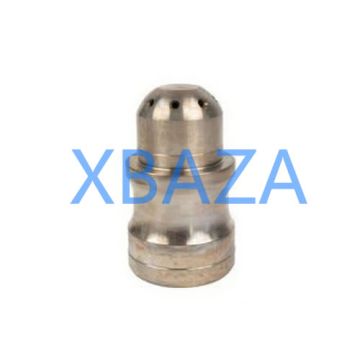
The Jenbacher combustion chamber is a critical component of Jenbacher gas engines, designed to efficiently burn gaseous fuels (natural gas, biogas, landfill gas, etc.) while minimizing emissions and maximizing power output. Proper maintenance is essential to ensure optimal engine performance, prevent unplanned downtime, and extend the service life of the chamber and associated components.
Jenbacher combustion chambers are engineered for durability, but exposure to high temperatures, fuel impurities, and operational wear requires regular inspection and maintenance to avoid issues such as incomplete combustion, thermal stress cracking, or fuel leakage.
2. Pre-Maintenance Safety Protocols
- Isolate the Engine: Shut down the engine completely and lock out/tag out (LOTO) all power sources, fuel supply lines, and cooling systems to prevent accidental startup.
- Depressurize Systems: Relieve all pressure from fuel lines, combustion chamber, and exhaust systems. Verify pressure is at 0 psi before opening any access panels.
- Allow Cooling: Let the combustion chamber cool to ambient temperature (minimum 2-4 hours post-shutdown) to avoid thermal burns and prevent damage to sensitive components during inspection.
- Ventilate the Area: Ensure proper ventilation to remove any residual fuel gases; use gas detection equipment to confirm safe oxygen and flammable gas levels (≤ 10% of LEL).
- Personal Protective Equipment (PPE): Wear appropriate PPE including heat-resistant gloves, safety glasses/goggles, flame-retardant clothing, and respiratory protection (if required for fuel type or ventilation conditions).
- Authorized Personnel Only: Only trained, certified technicians with knowledge of Jenbacher engines should perform combustion chamber maintenance.
3. Routine Maintenance Tasks & Intervals
Routine maintenance frequency depends on fuel quality, engine load profile, and operating hours. Below is a standard maintenance schedule aligned with Jenbacher OEM recommendations:
| Maintenance Task | Interval | Key Objectives |
|---|---|---|
| Visual Inspection of Exterior | Every 500 Operating Hours / Monthly | Check for cracks, corrosion, fuel/oil leaks, loose fasteners, or damage to insulation |
| Internal Visual Inspection | Every 1,000 Operating Hours / Quarterly | Inspect for carbon buildup, thermal stress cracks, liner wear, and seal integrity |
| Carbon Deposition Removal | Every 2,000 Operating Hours / Semi-Annually | Remove carbon deposits to restore combustion efficiency and prevent hot spots |
| Seal Replacement | Every 4,000 Operating Hours / Annually | Replace gaskets and seals to prevent fuel/air leaks and maintain pressure integrity |
| Combustion Efficiency Testing | Every 5,000 Operating Hours / Annually | Measure exhaust gas composition (CO, NOₓ, O₂) to verify optimal combustion |
| Full Overhaul | Every 8,000–12,000 Operating Hours / 2–3 Years | Complete disassembly, inspection, repair/replacement of worn components, and reassembly |
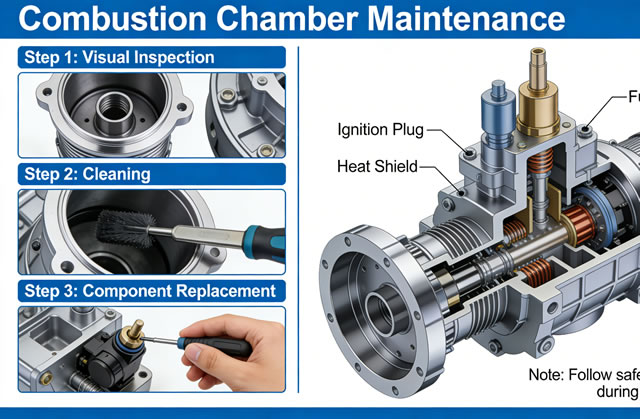
3.1 Step-by-Step Routine Inspection Process
- Remove access panels and insulation (if fitted) to expose the combustion chamber exterior.
- Inspect the chamber casing for:
- Hairline cracks (pay special attention to weld joints and heat-affected zones)
- Corrosion or pitting (common with biogas/landfill gas fuel types)
- Loose or damaged mounting bolts/nuts
- Signs of fuel/oil leakage (stains, odor, or residue)
- Use a borescope to inspect the internal liner:
- Check for thermal fatigue cracks (especially around fuel injector ports)
- Assess carbon buildup (excessive deposits indicate incomplete combustion)
- Verify liner thickness (measure wear against OEM specifications)
- Inspect flame arrester (if fitted) for blockages or damage
- Examine fuel injectors and air intake ports for alignment, damage, or clogging.
- Test the integrity of combustion chamber seals/gaskets using pressure decay testing (if available) or soap solution (apply to joints to check for gas bubbles).
4. Deep Maintenance & Component Replacement
4.1 Carbon Deposition Removal
Excessive carbon buildup in the combustion chamber reduces thermal efficiency, increases emissions, and creates hot spots that can damage the liner. Follow these steps for safe removal:
- Use low-pressure compressed air (≤ 30 psi) with a soft-bristle brush to loosen surface carbon deposits (avoid metal brushes that scratch the liner).
- For stubborn deposits, use Jenbacher-approved solvent cleaners (avoid harsh chemicals that damage chamber coatings).
- Vacuum all loosened carbon debris to prevent it from entering other engine components during reassembly.
- After cleaning, inspect the liner for hidden cracks or wear that may have been covered by deposits.
4.2 Combustion Chamber Liner Replacement
Replace the combustion chamber liner if any of the following conditions are found:
- Visible cracks longer than 10mm (or as specified by Jenbacher OEM)
- Thickness reduction beyond OEM minimum limits (typically 20% wear)
- Severe pitting or corrosion that compromises structural integrity
- Deformation or warping of the liner surface
- Remove the old liner by disconnecting fuel injectors, exhaust connections, and mounting brackets.
- Clean the chamber housing thoroughly to remove any debris or old gasket material.
- Install the new liner with OEM-specified gaskets and torque fasteners to the recommended values (refer to Jenbacher service manual for torque specs).
- Verify liner alignment and clearance to ensure proper fuel/air mixing and exhaust flow.
4.3 Seal and Gasket Replacement
Worn or damaged seals/gaskets are a common cause of fuel leaks and inefficient combustion. Replace all seals/gaskets during scheduled overhauls or if leaks are detected:
- Remove old gaskets using a plastic scraper (avoid metal tools that scratch mating surfaces).
- Clean mating surfaces with isopropyl alcohol to remove oil, grease, or residue.
- Apply a thin layer of OEM-approved sealant (if required) to the new gasket and position it correctly.
- Torque fasteners in a crisscross pattern to ensure even compression and prevent gasket distortion.
5. Post-Maintenance Testing & Verification
After completing maintenance, perform the following tests to confirm the combustion chamber is operating correctly:
- Leak Test: Pressurize the combustion chamber to 5-10 psi (per OEM guidelines) and check for leaks using a gas detector or soap solution. Repair any leaks before startup.
- Engine Startup & Idle Check: Start the engine and run at idle for 15-30 minutes. Monitor for:
- Unusual noises (knocking, rattling) from the combustion chamber
- Excessive exhaust smoke (black smoke = incomplete combustion; blue smoke = oil contamination)
- Fuel/air pressure fluctuations
- Emissions Testing: Measure exhaust gas parameters (CO, NOₓ, O₂, CO₂) to ensure compliance with local regulations and Jenbacher performance standards. Adjust fuel/air ratio if needed.
- Thermal Monitoring: Use infrared thermometers to check for hot spots on the combustion chamber exterior (indicates uneven heating or internal damage).
- Load Testing: Gradually increase engine load to 100% and monitor performance for 1-2 hours. Record key metrics (fuel consumption, exhaust temperature, power output) for comparison against baseline values.
6. Troubleshooting Common Issues
| Common Issue | Root Cause | Recommended Solution |
|---|---|---|
| Incomplete Combustion | Carbon buildup, fuel/air ratio imbalance, clogged injectors | Clean carbon deposits, calibrate fuel/air mix, inspect/replace injectors |
| Combustion Chamber Cracking | Thermal stress, uneven heating, overloading | Replace cracked components, check cooling system, adjust load profile |
| Fuel Leaks | Worn seals/gaskets, loose fasteners, damaged fuel lines | Replace seals/gaskets, retorque fasteners, repair/replace fuel lines |
| High Exhaust Emissions | Poor fuel quality, incorrect ignition timing, liner wear | Filter fuel supply, recalibrate ignition system, inspect/replace liner |
| Excessive Vibration | Misaligned chamber, loose mounting bolts, damaged internal components | Realign chamber, torque fasteners to specs, inspect/replace damaged parts |
7. Long-Term Maintenance Best Practices
- Document All Maintenance: Keep detailed records of inspections, repairs, component replacements, and test results (include dates, operating hours, and technician names).
- Optimize Fuel Quality: Use fuel filtration systems to remove impurities (moisture, particulates, sulfur) that accelerate chamber wear and carbon buildup.
- Monitor Operating Conditions: Avoid prolonged operation at extreme loads (idle or 100% load) – maintain load between 40-80% to reduce thermal stress.
- Schedule Preventive Maintenance: Follow Jenbacher’s OEM maintenance schedule strictly – preventive maintenance is far less costly than unplanned repairs.
- Train Technicians: Ensure maintenance staff receive regular training on Jenbacher combustion chamber technology and OEM updates.
- Inspect Auxiliary Systems: Regularly check cooling systems, fuel supply systems, and exhaust systems – issues in these systems can indirectly damage the combustion chamber.