The cylinder liner is a key component of Jenbacher gas generator engines, serving as the inner wall of the cylinder that guides the piston’s reciprocating movement and forms a sealed combustion chamber together with the piston, piston rings, and cylinder head. Operating in a harsh environment of high temperature, high pressure, and continuous friction with the piston rings, the cylinder liner’s integrity and performance directly affect the engine’s compression ratio, combustion efficiency, and overall reliability. Regular and standardized maintenance of cylinder liners is essential to prevent premature wear, cylinder scuffing, and gas leakage, thereby extending the service life of the engine and the generator. This article details the core maintenance points of Jenbacher generator cylinder liners, including inspection, cleaning, wear assessment, replacement, and safety precautions, which can be directly copied and applied in daily maintenance work.
1. Regular Inspection: Identify Hidden Dangers in Advance
Regular inspection is the key to ensuring the normal operation of cylinder liners. The inspection cycle should strictly follow Jenbacher’s official maintenance manual, generally every 6,000 to 10,000 operating hours. For generators operating in harsh conditions (such as high dust, high humidity, unstable gas quality, or frequent load changes), the inspection cycle should be shortened to 4,000 to 6,000 operating hours to timely detect potential problems.
Key inspection items and operation methods:
-
Visual Inspection: After disassembling the cylinder head and removing the piston, carefully inspect the inner surface of the cylinder liner. Focus on checking for scratches, scuffing marks, corrosion, or ablation on the inner wall; whether there are cracks (especially at the top and bottom of the liner) or uneven wear; and whether the upper and lower sealing surfaces of the liner are damaged, deformed, or have carbon deposits. Scuffing marks or deep scratches indicate abnormal friction between the piston rings and the liner, which needs to be addressed immediately.
-
Dimension Measurement: Use professional measuring tools (such as a bore gauge, micrometer, and vernier caliper) to measure the key dimensions of the cylinder liner, including the inner diameter (measured at the top, middle, and bottom of the liner, and at 90° angles), the ovality (difference between the maximum and minimum inner diameters at the same cross-section), and the taper (difference between the inner diameters at the top and bottom of the liner). All measured values must comply with Jenbacher’s official specifications. Excessive ovality or taper will cause uneven wear of the piston rings and piston, leading to poor sealing and increased oil consumption.
-
Clearance Check: Measure the clearance between the cylinder liner and the piston (piston-liner clearance) using a feeler gauge. The clearance should be within the range specified by Jenbacher (usually 0.03-0.08 mm, depending on the engine model). Too small a clearance will cause jamming due to thermal expansion; too large a clearance will lead to gas leakage, reduced compression ratio, and increased noise.
-
Sealing Performance Inspection: After inspecting and cleaning the cylinder liner, assemble the piston, piston rings, and cylinder head, then conduct a cylinder pressure test. If there is abnormal pressure drop or air leakage, check whether the cylinder liner, piston rings, or cylinder head gasket is worn or damaged, and repair or replace them accordingly.
2. Cleaning: Remove Deposits and Ensure Smooth Operation
During the operation of the generator, carbon deposits, oil stains, and metal debris will inevitably accumulate on the inner surface and sealing surfaces of the cylinder liner. These deposits will increase friction between the piston rings and the liner, affect heat dissipation, reduce combustion efficiency, and even accelerate liner wear. Therefore, regular cleaning is an important part of cylinder liner maintenance.
Standard cleaning steps and precautions:
-
Pre-cleaning Preparation: Before cleaning, remove the cylinder liner from the engine block, and clean the outer surface of the liner to remove dust, oil stains, and rust. Place the liner in a clean, well-ventilated area to avoid contamination.
-
Inner Surface Cleaning: Use a professional cylinder liner cleaning agent (compatible with Jenbacher engine components) to soak the inner surface of the liner. After soaking for the specified time (usually 15-30 minutes), use a non-metallic brush (such as a brass brush or nylon brush) to gently scrub the inner wall, removing carbon deposits, oil stains, and metal debris. Avoid using steel wire brushes or sharp tools, as they may scratch the inner surface of the liner, leading to increased wear and scuffing.
-
Sealing Surface Cleaning: Use a clean cloth dipped in neutral cleaning agent to wipe the upper and lower sealing surfaces of the cylinder liner, ensuring there are no carbon deposits, oil stains, or scratches. The sealing surface must be flat and smooth to ensure good sealing performance after assembly.
-
Rinsing and Drying: Rinse the cylinder liner thoroughly with clean water to remove residual cleaning agent, then dry it completely with cold air or a clean, dry cloth. Ensure that no water or cleaning agent remains in the liner, as this may cause corrosion or affect the lubrication effect during operation.
-
Post-cleaning Inspection: After cleaning, re-inspect the inner surface and sealing surfaces of the liner for scratches, cracks, or other damage. If any problems are found, handle them in a timely manner before reassembly.
3. Wear Assessment: Determine Whether to Replace the Cylinder Liner
Cylinder liners have a limited service life, and timely replacement is crucial to avoid serious engine failures caused by excessive wear. The following are the key criteria for assessing cylinder liner wear and determining whether replacement is necessary:
-
Exceeding Wear Limits: If the measured inner diameter, ovality, or taper of the cylinder liner exceeds the maximum limit specified in Jenbacher’s manual, the liner is excessively worn and must be replaced. Generally, the maximum allowable ovality and taper for Jenbacher generator cylinder liners are 0.05-0.08 mm (specific values vary by engine model).
-
Severe Scuffing or Scratches: If there are deep scuffing marks, scratches, or grooves on the inner surface of the liner that cannot be repaired by cleaning, the liner must be replaced. These defects will cause rapid wear of the piston rings and piston, leading to gas leakage and reduced engine performance.
-
Cracks or Corrosion: If there are cracks (especially at the top edge or bottom of the liner) or severe corrosion on the inner or outer surface of the liner, the liner is unsafe to use and must be replaced immediately to prevent liner fracture or water leakage during operation.
-
Sealing Surface Damage: If the upper or lower sealing surface of the liner is severely damaged, deformed, or has deep scratches, it will affect the sealing performance, leading to gas or water leakage. In this case, the liner should be replaced.
-
Service Life Expiration: Even if the liner shows no obvious wear, it should be replaced according to Jenbacher’s official service life recommendation. Generally, Jenbacher generator cylinder liners have a service life of 25,000 to 35,000 operating hours (varies by engine model and operating conditions).
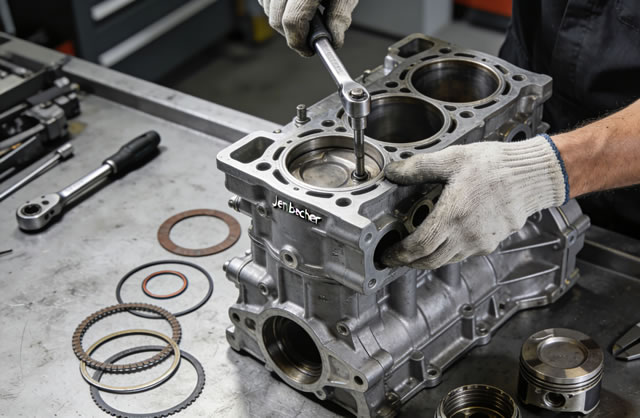
4. Replacement: Standard Operation to Ensure Installation Quality
Replacing the cylinder liner requires strict adherence to Jenbacher’s installation specifications to ensure the correctness and reliability of the installation, avoiding problems such as poor sealing, cylinder scuffing, or engine damage caused by improper operation.
Standard replacement steps:
-
Preparation Work: Ensure the generator is turned off, the power supply is disconnected, and the engine is fully cooled. Prepare the new cylinder liner (Jenbacher OEM parts), cylinder liner gasket, installation tool, measuring tool, and engine oil. Confirm that the new liner matches the engine model to ensure compatibility.
-
Disassembly: Disassemble the cylinder head, remove the piston and connecting rod, then use a professional tool to carefully remove the old cylinder liner from the engine block. During disassembly, avoid damaging the engine block’s cylinder bore or the liner’s sealing surfaces.
-
Engine Block Preparation: Clean the engine block’s cylinder bore thoroughly, removing dust, oil stains, and rust. Check the cylinder bore for wear or deformation; if any problems are found, repair the engine block before installing the new liner.
-
New Liner Installation:
-
Apply a thin layer of engine oil to the outer surface of the new cylinder liner and the inner surface of the engine block’s cylinder bore to reduce friction during installation and prevent damage to the liner.
-
Carefully place the new liner into the cylinder bore, ensuring it is installed in the correct direction (markings on the liner should align with the engine block’s positioning marks). Use a press tool to press the liner into place evenly, ensuring the upper and lower sealing surfaces are flush with the engine block.
-
Install the cylinder liner gasket on the lower sealing surface of the liner, ensuring it is correctly positioned and free of wrinkles or damage. The gasket must be compatible with the liner and engine model to ensure good sealing.
-
-
Post-installation Assembly: Reinstall the piston, piston rings, connecting rod, and cylinder head in the correct order. Tighten the cylinder head bolts and connecting rod cap bolts to Jenbacher’s specified torque with a torque wrench, ensuring uniform torque to avoid uneven pressure on the liner.
-
Test Run and Inspection: After assembly, start the generator and conduct a test run. Monitor the engine’s operation status, including noise, vibration, and exhaust gas. Check for gas leakage, water leakage, or oil leakage around the cylinder liner. If any abnormalities are found, stop the machine immediately for inspection and adjustment.
Special Note: Always use Jenbacher OEM cylinder liners and gaskets. Non-OEM parts may not match the engine’s parameters and tolerances, leading to poor sealing, uneven wear, and even engine damage, which may void the generator’s warranty.
5. Safety Precautions: Ensure Safe and Effective Maintenance
Cylinder liner maintenance involves disassembling and assembling key engine components, which requires strict adherence to safety precautions to avoid personal injury and equipment damage:
-
Before maintenance, ensure the generator is completely turned off, the power supply is disconnected, and the engine is fully cooled (surface temperature below 40℃) to avoid burns and accidental startup.
-
Wear professional protective equipment, including heat-resistant gloves, safety glasses, and work shoes, to prevent injury from sharp edges, high-temperature components, or cleaning agents.
-
Use professional tools that meet specifications. Avoid using inferior or inappropriate tools, which may damage the cylinder liner, engine block, or other components.
-
During disassembly and assembly, mark the position and direction of each part to ensure correct reinstallation. Avoid mixing parts from different cylinders.
-
Keep the maintenance area clean and tidy. Do not place tools, parts, or cleaning agents randomly to prevent them from falling into the engine cylinder or other components, causing equipment failure.
-
When pressing the cylinder liner into the engine block, operate the press tool evenly and slowly to avoid damaging the liner or the engine block. Do not use excessive force.
-
After maintenance, conduct a comprehensive inspection before starting the generator. Ensure all components are installed correctly and securely, and there are no loose parts or leaks.
6. Additional Maintenance Tips
-
Maintain good lubrication: Regularly replace the engine oil and oil filter according to Jenbacher’s specifications to ensure the cylinder liner and piston rings are fully lubricated, reducing friction and wear. Use engine oil that meets Jenbacher’s recommended grade.
-
Ensure stable gas quality: Install a high-quality gas filter and regularly replace the filter element to remove impurities in the gas, avoiding incomplete combustion and excessive carbon deposits on the cylinder liner.
-
Avoid overloading and frequent cold starts: Long-term overloading will increase the load on the cylinder liner, leading to high temperature and accelerated wear. Frequent cold starts will cause uneven thermal expansion of the liner, increasing the risk of scuffing.
-
Store spare parts properly: Spare Jenbacher cylinder liners should be stored in a dry, clean, and cool environment, avoiding moisture, dust, or collision. Do not place heavy objects on the liner to prevent deformation.
-
Use professional maintenance services: For complex cylinder liner replacement or engine disassembly, contact Jenbacher’s official after-sales service team to ensure maintenance quality and avoid improper operation causing equipment damage.
In summary, the cylinder liner is a critical component that ensures the normal operation of Jenbacher gas generators. By following the inspection, cleaning, wear assessment, and replacement guidelines outlined in this article, using genuine OEM parts, and strictly adhering to safety precautions, you can effectively extend the service life of the cylinder liner, reduce maintenance costs, and ensure the long-term stable, efficient, and safe operation of your Jenbacher generator. This article can be directly copied and used as a reference for daily maintenance work.