


1. Overview
Jenbacher flame detectors are critical safety components in gas engine systems, designed to monitor and detect flame presence in combustion chambers. Proper maintenance ensures reliable operation, minimizes downtime, and complies with industry safety regulations (e.g., ATEX, NFPA). This guide outlines standard maintenance procedures, inspection schedules, and troubleshooting for all Jenbacher flame detector models (including 400, 600, and 900 series).
2. Safety Precautions
- Wear appropriate PPE (Personal Protective Equipment): safety glasses, heat-resistant gloves, and anti-static wristbands when handling sensitive components.
- Ensure the engine is cool and the detector housing is at ambient temperature to avoid burns.
- Do not modify detector wiring or components—any alterations may void the manufacturer’s warranty and compromise safety.
- Keep flammable materials away from the maintenance area.
3. Maintenance Schedule
| Maintenance Task | Frequency | Applicable Models | Responsible Personnel |
|---|---|---|---|
| Visual inspection (cleanliness, physical damage) | Weekly | All models | Field technician |
| Optical lens cleaning | Monthly | All models | Field technician |
| Functional testing (flame response) | Quarterly | All models | Certified maintenance technician |
| Wiring and connection inspection | Semi-annually | All models | Electrical technician |
| Calibration | Annually / After component replacement | All models | Jenbacher authorized service engineer |
| Complete component inspection/replacement | Every 3 years | 400/600 series (5 years for 900 series) | Jenbacher authorized service engineer |
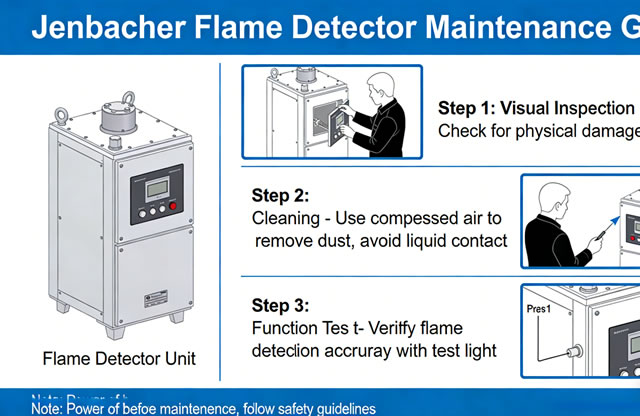
4. Step-by-Step Maintenance Procedures
4.1 Visual Inspection
- Shut down the engine and apply LOTO procedures.
- Inspect the detector housing for physical damage (dents, cracks, corrosion) or loose mounting hardware.
- Check for oil/coolant leaks near the detector—contamination can impair performance.
- Verify that the detector’s viewing window is aligned with the combustion chamber (misalignment causes false no-flame alarms).
- Inspect cable routing for abrasion, cuts, or excessive bending—damaged cables cause signal loss.
4.2 Optical Lens Cleaning
- Remove the detector cover using a torque wrench (torque setting: 8 Nm) to avoid over-tightening.
- Gently wipe the lens with a lint-free microfiber cloth dampened with approved cleaning fluid.
- For heavy contamination (carbon deposits), use a soft-bristled brush to loosen debris before wiping.
- Inspect the lens for scratches or discoloration—replace if damaged (refer to Section 5).
- Reinstall the cover and tighten to the specified torque; ensure the gasket is intact to maintain IP65 rating.
4.3 Functional Testing
- Restore power to the detector (ensure LOTO is removed only by authorized personnel).
- Initiate a test via the Jenbacher Control Unit (JCU) or using the detector’s test button (if equipped).
- Verify that the detector recognizes the test flame within 2-5 seconds (normal response time).
- Check for error codes on the JCU:
- Code E101: No flame detected (verify alignment/lens cleanliness)
- Code E102: False flame alarm (check for ambient light interference)
- Code E103: Signal loss (inspect wiring/connections)
- Document test results in the maintenance log (include date, technician name, and any anomalies).
4.4 Calibration
Calibration must be performed using Jenbacher OEM calibration tools (part no. 789012) to ensure accuracy:
- Connect the calibration tool to the detector’s test port.
- Follow the JCU calibration wizard prompts to set the flame threshold and sensitivity.
- Calibrate against a reference flame (Jenbacher standard: 1000 ± 50 lux at detector lens).
- Save calibration data to the detector’s memory and print a calibration certificate for compliance records.
5. Component Replacement Guidelines
Replace the following components when worn, damaged, or at the end of their service life:
- Lens assembly: Replace if scratched, cracked, or coated with irreversible contamination (service life: 2-3 years).
- Seals/gaskets: Replace every 12 months or if hardened/cracked (maintains waterproofing).
- Detector sensor: Replace every 3-5 years (per Jenbacher OEM recommendation) or if functional tests fail repeatedly.
- Cables/connectors: Replace if insulation is damaged or connections show corrosion.
6. Troubleshooting Common Issues
| Issue | Possible Cause | Resolution |
|---|---|---|
| No flame detection (E101) | 1. Dirty lens 2. Misalignment 3. Failed sensor | 1. Clean lens 2. Realign detector 3. Test/replace sensor |
| False flame alarms (E102) | 1. Ambient light interference 2. Faulty wiring 3. Calibration drift | 1. Install light shield 2. Inspect wiring 3. Recalibrate |
| Signal loss (E103) | 1. Damaged cables 2. Loose connections 3. Power supply failure | 1. Replace cables 2. Tighten connections 3. Test power supply |
| Detector overheating | 1. Poor ventilation 2. Proximity to hot components | 1. Improve airflow 2. Relocate detector (per OEM guidelines) |
7. Record-Keeping Requirements
Maintain a digital/physical maintenance log for each flame detector, including:
- Date and time of each maintenance task
- Technician name and certification number
- Results of inspections/tests/calibrations
- Component replacements (part numbers and serial numbers)
- Any corrective actions taken
Logs must be retained for a minimum of 5 years to comply with ISO 55001 and Jenbacher warranty requirements.
Download Maintenance Log Template8. Contact Support
For technical assistance or OEM service:
- Jenbacher Service Hotline: +43 7229 200-0
- Email: [email protected]
- Authorized Service Partners: jenbacher.com/service-partners

