The MWM connecting rod is a critical load-bearing component in MWM diesel engines, responsible for transferring the reciprocating motion of the piston to the rotational motion of the crankshaft. As a core part of the engine’s power transmission system, its structural integrity, dimensional accuracy, and operational condition directly determine engine performance, fuel efficiency, and service life. Improper maintenance, installation errors, or premature wear of the connecting rod can lead to catastrophic engine failures, including piston seizure, crankshaft damage, and even complete engine breakdown.
This comprehensive guide covers all aspects of MWM connecting rod inspection, routine maintenance, professional repair, fault diagnosis, and correct reassembly procedures. It is designed for maintenance technicians, engine rebuilders, and equipment operators working with MWM industrial, marine, and generator engines.
1. Core Functions & Structural Importance of MWM Connecting Rods
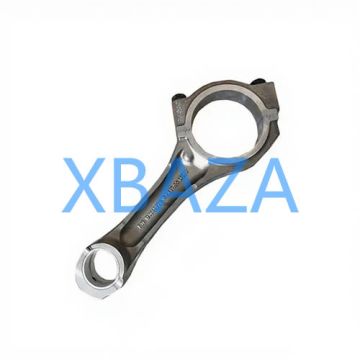
MWM connecting rods are precision-forged from high-strength alloy steel to withstand extreme combustion pressures, cyclic loads, and high-temperature operating conditions. Each rod consists of three key components: the small end (piston pin end), the rod shank, and the big end (crankshaft end). The small end connects to the piston via a piston pin, while the big end attaches to the crankshaft using precision bearings. This assembly must maintain perfect alignment and tight tolerances to ensure smooth power delivery.
- Withstands continuous tensile and compressive forces during engine operation
- Transmits power from piston to crankshaft without friction or deflection
- Maintains strict dimensional tolerances to prevent bearing failure
- Supports proper lubrication flow to critical friction surfaces
- Ensures stable piston movement and reduces engine vibration
2. Routine Maintenance & Preventive Care (Critical for Longevity)
Preventive maintenance is the most effective way to extend the service life of MWM connecting rods and avoid costly repairs. All maintenance activities must follow MWM engine manufacturer specifications and safety protocols.
2.1 Regular Visual & Operational Inspections
Perform visual inspections during every engine service interval (every 250/500/1000 operating hours based on engine model):
- Check for oil leaks around the connecting rod big end and small end seals
- Listen for abnormal knocking, rattling, or metallic noises from the engine cylinder block
- Monitor engine oil pressure; low pressure indicates potential bearing wear
- Inspect engine exhaust for black smoke, blue smoke, or abnormal emissions
- Record operating temperature and vibration levels for trend analysis
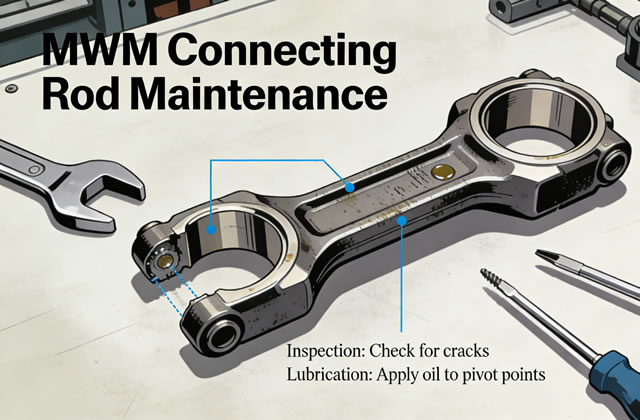
2.2 Lubrication System Maintenance
Proper lubrication is the lifeblood of the connecting rod assembly. Inadequate lubrication is the leading cause of connecting rod failure:
- Use only MWM-approved engine oil with the correct viscosity grade
- Replace engine oil and oil filters at the manufacturer-recommended intervals
- Flush the lubrication system during major overhauls to remove sludge and metal particles
- Inspect oil passages in the connecting rod for clogging or blockages
- Verify oil flow to connecting rod bearings during engine testing
2.3 Load & Operating Condition Management
Avoid excessive engine loads that place abnormal stress on connecting rods:
- Prevent engine overloading and prolonged full-load operation
- Avoid rapid acceleration/deceleration and sudden load changes
- Ensure proper engine warm-up before applying full load
- Maintain optimal cooling system performance to prevent overheating
3. Professional Disassembly & Inspection Procedures
When performing engine overhauls or troubleshooting connecting rod issues, strict disassembly and inspection procedures are mandatory. Always use calibrated tools and follow torque specifications.
3.1 Safe Disassembly Steps
- Allow the engine to cool completely and disconnect all power sources
- Drain engine oil and remove the engine oil pan
- Mark the connecting rod and cap with cylinder numbers for correct reassembly
- Loosen connecting rod bolts gradually in a crisscross pattern
- Remove the rod cap and bearings without scratching journal surfaces
- Push the connecting rod and piston assembly upward and remove from the cylinder
3.2 Detailed Dimensional & Visual Inspection
Conduct a full inspection using precision measuring tools (micrometers, bore gauges, straight edges):
- Rod Shank: Check for cracks, bending, twisting, or material fatigue (magnetic particle testing recommended for critical applications)
- Small End Bore: Measure inner diameter; check for ovality, wear, or bushing damage
- Big End Bore: Inspect for distortion, scratches, or bolt hole damage
- Rod Bolts: Check for elongation, thread damage, or fatigue (replace bolts if any defects are found)
- Bearings: Inspect for pitting, scoring, alloy peeling, or excessive wear
4. Common Faults, Causes & Repair Solutions
Understanding common connecting rod failures allows for targeted repairs and reduces recurrence. Below are the most frequent issues and professional fixes:
4.1 Connecting Rod Bending/Twisting
Causes: Hydraulic lock (coolant/oil entering cylinder), overloading, piston seizure, improper installation
Repair: Minor bending can be corrected with specialized straightening tools; severe bending requires full connecting rod replacement
4.2 Bearing Wear & Failure
Causes: Oil starvation, contaminated oil, misalignment, excessive clearance, improper torque
Repair: Replace bearings with genuine MWM parts; polish crankshaft journal if damaged; verify oil pressure and flow
4.3 Small End Bushing Wear
Causes: Lack of lubrication, piston pin friction, dirt contamination
Repair: Replace the small end bushing and re-bore to factory tolerances; install new piston pin
4.4 Connecting Rod Bolt Failure
Causes: Over-torquing, under-torquing, bolt fatigue, improper bolt grade
Repair: Replace all connecting rod bolts with genuine MWM fasteners; follow exact torque and angle specifications
4.5 Cracks & Fractures
Causes: Material fatigue, excessive load, thermal stress, manufacturing defects
Repair: NO REPAIR POSSIBLE – Replace the connecting rod immediately. Cracked rods will cause catastrophic engine failure
5. Professional Repair & Reconditioning Standards
MWM connecting rod reconditioning must adhere to OEM precision standards to ensure reliable operation:
- All machined surfaces must meet MWM factory dimensional tolerances (±0.001mm)
- Small end bushings must be pressed, reamed, and honed to correct piston pin fit
- Big end bores must be true and round with no taper or ovality
- Rod shank must be perfectly straight with zero bending or twist
- All components must be cleaned ultrasonically to remove debris before reassembly
6. Correct Reassembly & Installation Procedures
Improper reassembly is the top cause of post-repair connecting rod failure. Follow these steps strictly:
- Clean all components with lint-free cloths and compressed air; no debris allowed
- Install new bearings and small end bushing coated with clean engine oil
- Position the connecting rod on the crankshaft journal with matching alignment marks
- Install the rod cap in the original marked position (never swap caps between rods)
- Tighten rod bolts gradually in a crisscross pattern to MWM-specified torque
- Verify connecting rod rotation freedom – no binding or excessive play
- Check bearing clearance with plastic gauge to confirm proper fit
- Reinstall the piston-rod assembly into the cylinder and secure all components
7. Post-Repair Testing & Break-In Procedures
After repair and reassembly, perform testing to validate connecting rod performance:
- Run the engine at idle for 30–60 minutes to circulate oil and seat bearings
- Monitor oil pressure, temperature, and noise levels during break-in
- Perform a low-load test before returning to full operational service
- Re-torque connecting rod bolts after the initial break-in period (if required by MWM)
- Change engine oil and filter after the first 50 hours of operation
8. Long-Term Service Life Extension Recommendations
- Use only genuine MWM spare parts for all repairs and replacements
- Implement a strict oil analysis program to detect early wear metals
- Train maintenance staff on proper MWM engine service procedures
- Store spare connecting rods in a clean, dry, corrosion-free environment
- Document all maintenance, repairs, and operating hours for traceability
- Follow MWM’s official service manual for your specific engine model
Conclusion
The MWM connecting rod is an irreplaceable engine component that demands professional maintenance, precise repair, and strict adherence to OEM standards. By implementing routine inspections, proper lubrication, and correct installation practices, you can maximize the service life of connecting rods, minimize downtime, and avoid expensive engine overhauls.
Always prioritize safety, use calibrated tools, and rely on genuine MWM parts for all connecting rod maintenance and repair activities. Properly maintained MWM connecting rods will deliver consistent performance and reliability in even the most demanding operating conditions.