


Comprehensive Service Guide for Heavy-Duty Caterpillar Electronic Control Modules
1. Introduction to CAT Control Modules
Caterpillar (CAT) Control Modules serve as the central electronic brain of CAT industrial engines, generators, excavators, loaders, trucks, and other heavy machinery. These modules—often referred to as ECM (Engine Control Module), ECU (Electronic Control Unit), or TCM (Transmission Control Module)—regulate fuel injection, ignition timing, cooling systems, transmission functions, emissions, diagnostics, and overall machine performance.
Without proper maintenance, CAT Control Modules can experience communication failures, sensor errors, performance drops, shutdowns, and permanent hardware damage. Regular servicing extends service life, reduces downtime, and maintains peak operational efficiency.
2. Core Functions of CAT Control Modules
- Real-time monitoring of engine temperature, oil pressure, fuel delivery, and RPM
- Regulation of fuel injection timing and volume for optimal efficiency
- Transmission shifting logic and torque management
- Diagnostic trouble code (DTC) recording and system alerts
- Communication with sensors, actuators, and vehicle data networks
- Protection against overheating, overloading, and low-fluid conditions
- Emissions control for compliance with environmental standards
Always disconnect the battery power before inspecting, repairing, or replacing wiring and connectors. High-voltage circuits and improper handling can cause module damage, electric shock, or machine malfunction. Use anti-static wrist straps to prevent electrostatic discharge (ESD), which is a leading cause of internal circuit board failure.
3. Routine Maintenance Schedule for CAT Control Modules
Follow this maintenance cycle to ensure long-term reliability:
3.1 Daily Inspection
- Check for warning lights, fault codes, or abnormal machine behavior
- Verify stable engine idle, smooth acceleration, and normal response
- Inspect external wiring for visible damage, moisture, or corrosion
3.2 Monthly Maintenance
- Clean control module exterior and surrounding area
- Check mounting bolts for tightness and secure connections
- Use CAT diagnostic tools to scan and clear inactive fault codes
3.3 Quarterly Service
- Disconnect and inspect electrical connectors for corrosion or bent pins
- Test voltage supply and ground connections for stability
- Update module firmware if performance updates are available
3.4 Annual Overhaul
- Full diagnostic scan using CAT Electronic Technician (CAT ET) software
- Internal circuit and component inspection by certified technicians
- Replacement of deteriorated seals, gaskets, or damaged connectors
- Calibration of sensors and actuators linked to the module
4. Common Failures & Root Causes
4.1 Electrical Issues
Loose connections, corroded pins, voltage spikes, and damaged wiring are the most frequent causes of ECM malfunctions. Moisture intrusion and short circuits often lead to permanent board damage.
4.2 Thermal Damage
High operating temperatures degrade solder joints, capacitors, and microprocessors. Overheating occurs due to blocked ventilation, faulty cooling systems, or prolonged heavy loads.
4.3 Software & Firmware Errors
Outdated firmware, corrupted data, or incorrect programming can trigger false fault codes, performance limits, and intermittent shutdowns.
4.4 Mechanical Stress
Vibration from heavy machinery weakens internal components and loosens connections over time.
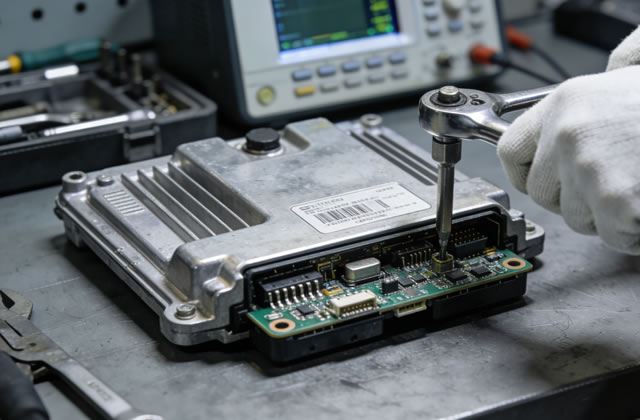
5. Step-by-Step Repair Procedures
5.1 Initial Diagnostic Testing
- Connect CAT ET or compatible diagnostic tool to the machine’s data port
- Retrieve and record all active and inactive DTCs
- Verify battery voltage, ground integrity, and power supply stability
- Test communication between the module and all connected sensors
5.2 Physical Inspection & Cleaning
- Remove dirt, dust, and oil using compressed air and non-abrasive cleaners
- Inspect the housing for cracks, water damage, or rust
- Clean connector pins with electrical contact cleaner
- Replace damaged or corroded connectors and pigtails
5.3 Repair or Replacement Decisions
Repair is recommended for:
- Minor connector damage
- Corrosion cleaning and restoration
- Solder joint rework
- Firmware corruption or programming errors
Replacement is required for:
- Burnt circuit boards
- Internal component failure
- Water-damaged PCBs
- Irreparable electrical shorts
5.4 Programming & Calibration
After repair or replacement, complete these steps:
- Install the latest OEM firmware and configuration files
- Calibrate engine parameters, idle speed, and fuel settings
- Perform a full system test to confirm no active faults
- Verify normal machine operation under load
6. Best Practices for Longevity
- Keep the control module area clean, dry, and free of oil or debris
- Use only genuine CAT connectors, seals, and replacement parts
- Avoid jump-starting machinery without proper surge protection
- Store spare modules in anti-static packaging at stable temperatures
- Train operators to report warning lights and abnormal behavior immediately
- Maintain complete service records for warranty and troubleshooting
- Always use certified technicians for complex repairs and programming
7. Troubleshooting Frequently Encountered Issues
7.1 No Communication with ECM
Check battery power, main fuses, ground connections, and data link cables. Verify the ignition switch is in the ON position during testing.
7.2 Intermittent Fault Codes
Inspect for loose wiring, damaged insulation, and corroded pins. Thermal stress often causes intermittent failures.
7.3 Engine Not Starting
Confirm ECM power supply, fuel system pressure, and crankshaft position sensor signals. Check for immobilizer or security lock conditions.
7.4 Poor Performance & Reduced Power
Update firmware, calibrate fuel settings, and inspect sensors for incorrect readings. Check for clogged filters or restricted airflow.
8. Conclusion
The CAT Control Module is critical to the performance, reliability, and durability of Caterpillar heavy equipment. Proactive maintenance, careful handling, timely repairs, and professional programming are essential to minimize downtime and maximize operational life.
By following the guidelines in this manual, technicians, fleet managers, and service teams can ensure consistent performance, reduce repair costs, and extend the service life of CAT control modules under all operating conditions.
Always refer to the official CAT service manual for model-specific specifications and procedures.

