Best Practices for Extending Piston Life and Ensuring Optimal Engine Performance
1. Introduction to CAT Pistons
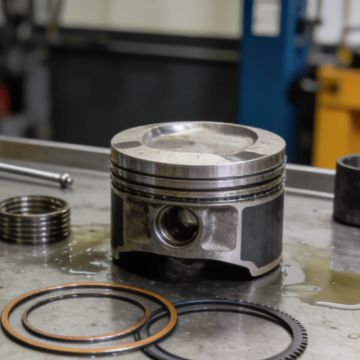
Caterpillar (CAT) pistons are critical components in heavy-duty diesel engines, designed to withstand extreme pressure, temperature, and mechanical stress. Used in construction, mining, agriculture, and industrial applications, CAT pistons play a vital role in converting fuel energy into mechanical power. Proper maintenance and timely repair of these pistons are essential to prevent engine failure, reduce downtime, and maintain operational efficiency.
CAT pistons are engineered with high-grade materials such as forged aluminum alloy and steel, tailored to meet the demands of high-compression diesel engines. Understanding their design, function, and failure modes is the first step in effective maintenance.
2. Pre-Maintenance Preparation
2.1 Safety First
Before performing any maintenance or repair work on CAT pistons, ensure strict adherence to safety protocols:
- Disconnect the battery and relieve all engine pressure to prevent accidental startup
- Wear personal protective equipment (PPE): safety glasses, heat-resistant gloves, protective clothing, and ear protection
- Work in a well-ventilated area and use proper lifting equipment for heavy engine components
- Ensure all tools are calibrated, inspected, and in good working condition
- Refer to the official CAT service manual for the specific engine model
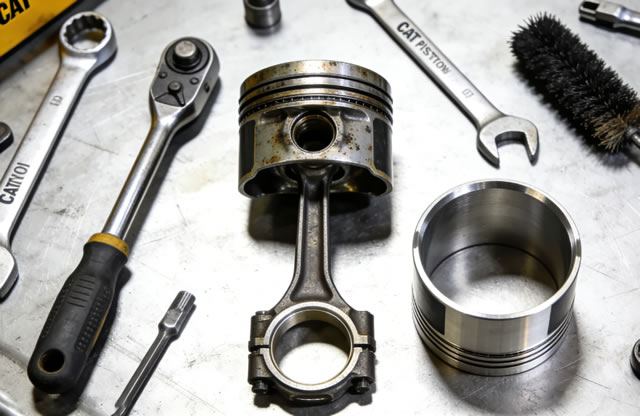
2.2 Required Tools and Materials
| Tool/Material Type | Specific Items |
|---|---|
| Hand Tools | Torque wrench (calibrated), socket set, piston ring compressor, piston pin removal tool, feeler gauges |
| Cleaning Supplies | Degreaser, lint-free cloths, ultrasonic cleaner (for precision parts), compressed air |
| Replacement Parts | Genuine CAT piston rings, piston pins, wrist pin bushings, piston skirts, gaskets, lubricants |
| Inspection Tools | Micrometer, dial indicator, bore gauge, visual inspection mirror, magnifying glass |
3. Step-by-Step Inspection Process
3.1 Removal of Pistons
- Remove the engine cylinder head and drain all engine oil and coolant
- Extract the connecting rod bolts and separate the connecting rod from the crankshaft
- Carefully push the piston assembly out of the cylinder bore (avoid scratching the cylinder walls)
- Label each piston and connecting rod to ensure correct reinstallation (matching cylinder numbers)
3.2 Key Inspection Points
Thoroughly inspect the piston for signs of wear, damage, or failure:
- Piston Crown: Check for cracks, erosion, or carbon buildup (carbon deposits can cause overheating)
- Piston Skirt: Inspect for scuffing, scoring, or excessive wear (indicates insufficient lubrication or misalignment)
- Piston Rings Grooves: Measure groove wear with feeler gauges; excessive wear causes oil consumption and loss of compression
- Piston Pin Bore: Check for ovality or out-of-roundness using a bore gauge (tolerance: ±0.002mm)
- Ring Lands: Inspect for cracks or breakage (common in high-load operating conditions)
4. Maintenance and Repair Procedures
4.1 Cleaning the Piston
Proper cleaning is critical for accurate inspection and reinstallation:
- Use a non-abrasive degreaser to remove oil, grease, and carbon deposits
- For stubborn carbon buildup, use a plastic scraper (avoid metal tools to prevent scratching)
- Clean piston ring grooves with a ring groove cleaner tool to remove carbon deposits
- Rinse with clean solvent and dry with compressed air (ensure no solvent residue remains)
- Clean oil passages thoroughly to prevent blockages that cause lubrication failure
4.2 Replacement of Worn Components
- Piston Rings: Replace rings if they show wear, breakage, or loss of tension; install new rings using a ring compressor (follow the direction marked on the rings – "TOP" faces the piston crown)
- Piston Pin: Replace if there is excessive play or scoring; lubricate the pin with engine oil before installation
- Wrist Pin Bushing: Press out worn bushings and install new ones using a press tool (ensure proper fit – 0.001-0.003mm clearance)
- Piston Skirt: If skirt wear exceeds manufacturer limits (0.15mm for CAT pistons), replace the entire piston assembly
4.3 Reinstallation of Pistons
- Lubricate the piston, rings, and cylinder walls with clean engine oil (CAT DEO or equivalent)
- Use a piston ring compressor to compress the rings and carefully insert the piston into the cylinder bore
- Align the connecting rod with the crankshaft journal and torque the connecting rod bolts to CAT specifications (typically 85-95 Nm for heavy-duty models)
- Verify piston clearance using a feeler gauge (standard clearance: 0.02-0.04mm for aluminum pistons)
- Reassemble the cylinder head and torque all bolts to the recommended specifications in the correct sequence
5. Post-Repair Testing and Break-In
5.1 Initial Testing
After reassembly, perform the following tests to ensure proper piston function:
- Perform a compression test to verify consistent compression across all cylinders (variance should not exceed 10%)
- Check for oil leaks around the piston and connecting rod area
- Monitor engine temperature and oil pressure during idle operation
5.2 Break-In Procedure
A proper break-in period is essential to seat new piston rings and ensure long-term durability:
- Run the engine at 1500-2000 RPM (no load) for 30 minutes
- Gradually increase load over the next 2-3 hours (avoid full load for the first 50 hours)
- Change engine oil and filter after the first 50 hours of operation
- Re-inspect piston performance at 100 hours to confirm no abnormal wear
6. Preventive Maintenance Tips
To extend the life of CAT pistons and reduce repair frequency, follow these preventive measures:
- Use only CAT-recommended fuel and oil (poor-quality fuel can cause carbon buildup and piston damage)
- Adhere to scheduled oil changes (every 250 hours for heavy-duty applications)
- Maintain proper engine cooling system function (overheating is a leading cause of piston failure)
- Avoid excessive idling (causes incomplete combustion and carbon deposits on pistons)
- Inspect air filters regularly (dirty filters cause lean fuel-air mixtures and piston overheating)
- Monitor engine performance metrics (excessive smoke, loss of power, or increased oil consumption indicate piston issues)
7. Common Piston Failure Modes and Solutions
| Failure Mode | Causes | Solutions |
|---|---|---|
| Piston Scuffing | Insufficient lubrication, overheating, misalignment | Check oil pressure, replace worn bearings, align piston correctly |
| Ring Groove Wear | Excessive heat, dirty oil, poor ring material | Replace piston rings, use high-quality oil, clean oil passages |
| Piston Crown Cracks | Thermal shock, detonation, overloading | Replace piston, check fuel injection timing, avoid overloading |
| Oil Consumption | Worn rings, piston skirt, or valve seals | Replace worn components, check cylinder wall condition |