Expert Recommendations for Optimal Performance and Longevity
1. Introduction to CAT Rocker Arms
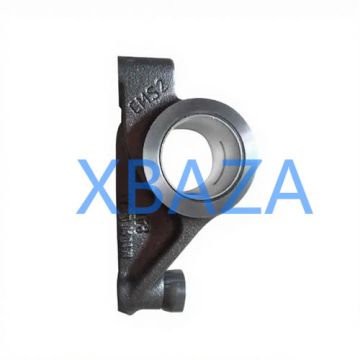
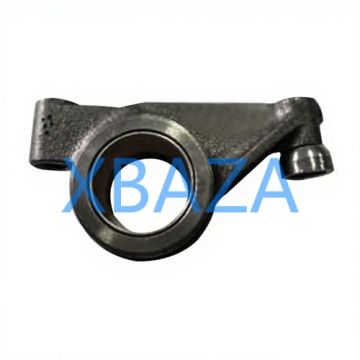
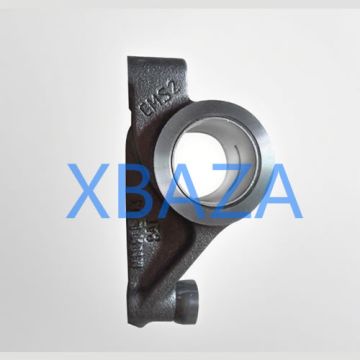
The rocker arm is a critical component in Caterpillar (CAT) internal combustion engines, serving as a mechanical linkage between the camshaft and the engine's valves. Its primary function is to convert the rotational motion of the camshaft into linear motion to open and close the intake and exhaust valves at precise timings. CAT rocker arms are engineered for heavy-duty applications, but regular maintenance and timely repairs are essential to prevent engine inefficiency, valve damage, or complete engine failure.
CAT rocker arms are used across a wide range of equipment, including construction machinery (excavators, loaders), agricultural equipment, generators, and heavy-duty trucks. Proper care of these components directly impacts engine performance, fuel efficiency, and overall operational reliability.
2. Key Inspection Procedures
Regular inspection is the first line of defense against rocker arm failure. Inspect rocker arms at every scheduled maintenance interval (typically every 250-500 operating hours for heavy-duty applications) or immediately if you notice any of the warning signs listed below.
2.1 Visual Inspection
- Check for visible cracks, chips, or wear on the rocker arm body, pivot point, and valve contact surface
- Inspect the rocker arm shaft for corrosion, scoring, or excessive play
- Examine the valve tip contact area for uneven wear, pitting, or galling
- Verify that the rocker arm retaining bolts/nuts are properly torqued and not loose
- Check for oil leaks around the rocker arm assembly (indicates faulty seals or gaskets)
2.2 Functional Inspection
- Rotate the engine manually and check for smooth movement of the rocker arm (no sticking or binding)
- Measure valve lash (clearance) using a feeler gauge – compare readings to CAT OEM specifications
- Listen for unusual noises (clicking, ticking, or knocking) during engine operation (indicates excessive wear or improper lash)
- Check for uneven valve lift (indicates bent or worn rocker arms)
3. Maintenance Best Practices
Proactive maintenance extends the lifespan of CAT rocker arms and reduces the risk of unexpected failures. Below are the core maintenance tasks:
3.1 Lubrication
CAT rocker arms rely on high-quality engine oil for proper lubrication of pivot points and contact surfaces. Follow these guidelines:
- Use only CAT-recommended engine oil (e.g., CAT DEO-ULS or equivalent) with the correct viscosity grade for your operating conditions
- Change engine oil and filters at the intervals specified in the equipment manual (typically every 500 hours for heavy-duty use)
- Inspect oil passages in the rocker arm assembly for clogs – clean with approved solvent if necessary
- Apply a thin layer of high-temperature grease to rocker arm pivot points during reassembly
3.2 Valve Lash Adjustment
Incorrect valve lash is one of the most common causes of rocker arm wear. Adjust valve lash as follows:
- Ensure the engine is at the correct temperature (follow OEM guidelines – cold or hot adjustment)
- Position the piston at Top Dead Center (TDC) for the cylinder being adjusted
- Loosen the locknut and turn the adjustment screw to achieve the specified lash (typically 0.15-0.30mm for intake, 0.25-0.40mm for exhaust)
- Tighten the locknut while holding the adjustment screw in place to prevent movement
- Recheck the lash after tightening to confirm accuracy
3.3 Cleaning and Protection
Keep the rocker arm assembly clean to prevent abrasive contaminants from causing wear:
- Clean the rocker cover and assembly with a non-corrosive solvent during maintenance
- Inspect and replace damaged or worn rocker cover gaskets to prevent dirt and debris from entering
- Apply anti-seize compound to threaded fasteners to prevent galling and ease future disassembly
4. Repair Procedures for Damaged CAT Rocker Arms
If inspection reveals damage or excessive wear, follow these step-by-step repair procedures:
4.1 Removal of Rocker Arm Assembly
- Disconnect the negative battery terminal to prevent accidental engine start
- Remove the rocker arm cover (drain any residual oil first)
- Label all rocker arms and associated components to ensure correct reassembly
- Loosen and remove the rocker arm shaft bolts/nuts (follow the reverse torque sequence specified by CAT)
- Carefully remove the rocker arms, shafts, and pushrods (if applicable)
4.2 Replacement of Damaged Components
Replace any components that show the following signs of damage:
- Cracks or fractures in the rocker arm body
- Excessive wear (>0.10mm) on pivot points or valve contact surfaces
- Bent or distorted rocker arm shafts
- Worn or damaged bushings/bearings
Always use CAT OEM replacement parts – aftermarket parts may not meet CAT's quality standards and can lead to premature failure.
4.3 Reassembly and Torque Specifications
- Clean all mating surfaces and lubricate pivot points with CAT-recommended grease
- Install new bushings/bearings (if replaced) and press them to the correct depth
- Position the rocker arms on the shafts and install the assembly in the engine
- Tighten the rocker arm shaft bolts/nuts to CAT-specified torque (typically 25-35 Nm, verify with your equipment manual)
- Adjust valve lash as outlined in Section 3.2
- Reinstall the rocker cover with a new gasket and torque fasteners to specification
5. Common Failure Modes and Root Causes
| Failure Mode | Common Root Causes | Preventive Actions |
|---|---|---|
| Cracked rocker arm body | Excessive valve lash, engine overheating, material fatigue | Regular lash adjustment, monitor engine temperature, replace worn components promptly |
| Worn pivot points | Poor lubrication, contaminated oil, misalignment | Use OEM oil, frequent oil changes, inspect alignment during assembly |
| Valve tip pitting | Uneven contact, excessive load, corrosion | Proper lash adjustment, check for bent pushrods, keep assembly clean |
| Loose fasteners | Improper torque, vibration, thermal cycling | Torque to OEM specs, use lock washers/nuts, recheck after initial operation |
6. Post-Repair Testing and Verification
After completing maintenance or repairs, verify the rocker arm assembly is functioning correctly:
- Start the engine and let it idle for 5-10 minutes – listen for unusual noises
- Check for oil leaks around the rocker cover and assembly
- Perform a valve lash recheck after the first 50 operating hours
- Monitor engine performance (power, fuel efficiency, idle stability) for any abnormalities
- Inspect exhaust for excessive smoke (indicates valve timing issues)