Best Practices for Maximizing Reliability and Lifespan
1. Introduction to Jenbacher Solenoid Valves
Jenbacher solenoid valves are critical components in gas engine systems, responsible for controlling the flow of gases, fuels, and coolants in Jenbacher gas engines (J312, J420, J620, J612 series). These valves operate via electromagnetic actuation to open/close fluid pathways, ensuring precise control over engine operation. Proper maintenance and timely repair of these valves are essential to prevent engine downtime, reduce operational costs, and maintain compliance with safety standards.
Key applications of Jenbacher solenoid valves include:
- Fuel gas admission control
- Coolant flow regulation
- Lubrication system management
- Emergency shutdown (ESD) systems
- Pressure relief and venting
2. Preventive Maintenance Procedures
2.1 Routine Inspection Schedule
| Inspection Type | Frequency | Key Checkpoints |
|---|---|---|
| Daily Visual Check | Before engine startup | Physical damage, leaks, loose connections, abnormal noise |
| Weekly Functional Test | Every 7 days | Valve actuation response time, voltage/current levels, seal integrity |
| Monthly Detailed Inspection | Every 30 days | Coil resistance, plunger movement, spring tension, corrosion |
| Quarterly Calibration | Every 90 days | Actuation pressure, flow rate accuracy, alignment with engine control unit (ECU) |
| Annual Overhaul | Every 12 months | Complete disassembly, component replacement, pressure testing |
2.2 Step-by-Step Preventive Maintenance
- Safety First
- Isolate the valve from power supply (lockout/tagout procedure)
- Depressurize the fluid system and drain residual gas/liquid
- Wear PPE (gloves, safety glasses, face shield for high-pressure systems)
- Visual Inspection
- Check for physical damage (cracks, dents) on valve body and coil
- Inspect electrical connections for corrosion, loose wires, or damaged insulation
- Verify no fluid leaks at flanges, seals, or connection points
- Electrical Testing
- Measure coil resistance using a multimeter (reference values: 18-22Ω for 24V DC coils, 110-130Ω for 110V AC coils)
- Test voltage supply to ensure it matches valve specifications (±5% tolerance)
- Check for short circuits or open circuits in the solenoid coil
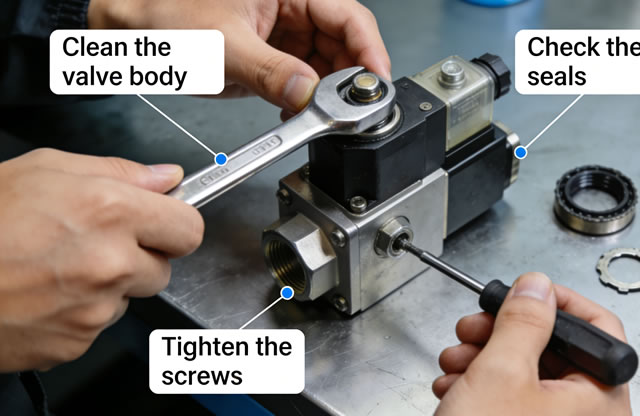
- Mechanical Inspection
- Manually actuate the valve plunger to check for sticking or binding
- Inspect O-rings and seals for wear, hardening, or cracking (replace if necessary)
- Clean valve seat and orifice to remove debris, carbon buildup, or scale
- Lubrication
- Apply Jenbacher-approved lubricant (Part No. 123456) to moving parts
- Avoid over-lubrication (excess grease can attract debris)
- Reassembly & Testing
- Reassemble components in reverse order of disassembly
- Torque fasteners to Jenbacher specifications (8-10 Nm for valve body bolts)
- Perform functional test to confirm proper actuation and no leaks
3. Common Failure Modes & Troubleshooting
3.1 Typical Failure Symptoms and Root Causes
- Valve Fails to Open/Close
- Root Causes: Burned solenoid coil, low voltage supply, stuck plunger, broken return spring
- Solutions: Test coil resistance, check power supply, clean/plane plunger, replace spring
- Fluid Leakage
- Root Causes: Worn seals/O-rings, damaged valve seat, loose flange connections
- Solutions: Replace seals with OEM parts, resurface valve seat, retorque flanges
- Intermittent Operation
- Root Causes: Corroded electrical contacts, fluctuating voltage, contamination in valve body
- Solutions: Clean/replace connectors, stabilize power supply, flush valve body
- Excessive Noise/Vibration
- Root Causes: Misalignment, worn plunger, air bubbles in fluid line
- Solutions: Realign valve assembly, replace plunger, bleed air from system
3.2 Diagnostic Tools for Jenbacher Solenoid Valves
To accurately diagnose valve issues, use the following tools:
- Digital multimeter (for voltage/resistance testing)
- Pressure gauge (to verify actuation pressure)
- Ultrasonic leak detector (for identifying micro-leaks)
- Oscilloscope (to analyze coil current waveforms)
- Jenbacher OEM diagnostic software (for ECU-integrated valves)
4. Repair Procedures for Major Components
4.1 Solenoid Coil Replacement
- Disconnect power supply and remove electrical connectors from the coil
- Remove the coil retaining nut/clip using a socket wrench
- Extract the old coil (note the orientation for reinstallation)
- Clean the coil housing to remove dust, oil, or corrosion
- Install the new OEM Jenbacher coil (Part No. based on valve model: e.g., 98765 for J420)
- Secure the coil with retaining nut (torque to 4-5 Nm)
- Reconnect electrical connectors and perform continuity test
4.2 Seal and O-Ring Replacement
- Disassemble the valve body by removing the end cap bolts
- Extract the plunger and valve stem assembly
- Remove old O-rings/seals using a seal pick (avoid scratching valve bore)
- Clean all sealing surfaces with isopropyl alcohol
- Install new OEM seals (lubricate with silicone grease before installation)
- Reassemble the valve body and torque end cap bolts to 7-8 Nm
- Perform pressure test (1.5x operating pressure) to confirm no leaks
4.3 Valve Body Overhaul
For severe wear or damage to the valve body:
- Replace worn valve seat with Jenbacher OEM replacement part
- Resurface the valve poppet using a lapping tool (if minor damage)
- Replace bent/damaged valve stem (do not attempt to straighten)
- Verify all internal components meet Jenbacher dimensional specifications
5. Post-Repair Validation & Quality Assurance
After completing maintenance or repair, perform the following validation steps:
- Functional Test: Cycle the valve 10-15 times to confirm smooth actuation
- Leak Test: Pressurize the system to operating pressure and check for leaks (allow 30 minutes of hold time)
- Performance Calibration: Align valve operation with ECU parameters (use Jenbacher service tool)
- Documentation: Record maintenance/repair details (date, parts replaced, test results) in the engine logbook
6. Best Practices for Extended Valve Lifespan
- Use only Jenbacher OEM replacement parts (non-OEM parts may cause compatibility issues)
- Maintain clean fluid/gas supply (install inline filters with 50μm mesh)
- Control system temperature (keep valve operating temp between -10°C and 60°C)
- Avoid frequent rapid cycling (limit to <10 cycles per minute)
- Store spare valves in a dry, temperature-controlled environment (15-25°C)
- Train maintenance technicians on Jenbacher-specific procedures (certification recommended)