Best Practices for Extending Service Life and Optimizing Performance
1. Introduction to Jenbacher Engine Rings
Jenbacher gas engines (series J312, J416, J620, etc.) rely on high-performance piston rings (commonly referred to as "Jenbacher Rings") to maintain compression, control oil consumption, and transfer heat from the piston to the cylinder liner. These critical components are engineered to withstand extreme operating conditions—including high temperatures (up to 600°C), pressure differentials, and constant friction—making proper maintenance non-negotiable for reliable engine operation.
Jenbacher Rings consist of three primary types: compression rings (top/bottom), oil control rings, and scraper rings. Each plays a unique role in ensuring the engine’s efficiency and longevity, and neglecting their maintenance can lead to catastrophic failures such as loss of compression, excessive oil burn, or cylinder liner damage.
2. Preventive Maintenance Guidelines
2.1 Routine Inspection Schedule
Preventive maintenance is the cornerstone of Jenbacher Ring longevity. Below is the recommended inspection frequency based on engine operating hours:
| Engine Type | Light Load (≤50% capacity) | Medium Load (50-80% capacity) | Heavy Load (>80% capacity) |
|---|---|---|---|
| J300 Series | Every 8,000 hours | Every 6,000 hours | Every 4,000 hours |
| J400/J600 Series | Every 10,000 hours | Every 7,500 hours | Every 5,000 hours |
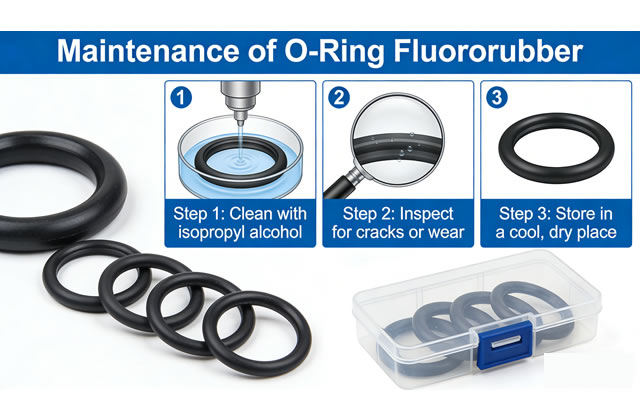
2.2 Key Inspection Procedures
- Visual Examination: Remove the piston assembly and check for cracks, scoring, pitting, or wear on the ring surface. Pay special attention to the ring face (contact with cylinder liner) and end gaps.
- End Gap Measurement: Use a feeler gauge to verify the ring end gap (clearance) in the cylinder liner. Jenbacher specifies a minimum gap of 0.2mm and maximum of 0.8mm (varies by ring size/engine model). Excessive gap indicates wear; insufficient gap risks ring seizure when heated.
- Radial Pressure Check: Use a ring tension tester to confirm the radial pressure (force keeping the ring against the cylinder wall). Deviations from Jenbacher’s OEM specifications (typically 15-25 N for compression rings) lead to oil leakage or compression loss.
- Groove Wear Assessment: Measure piston ring grooves for wear (maximum allowable wear: 0.05mm). Worn grooves cause ring flutter, reducing sealing efficiency.
Best Practice
Always clean the cylinder liner and piston grooves with Jenbacher-approved solvent (Part No. 987654) before inspection to avoid false wear readings from carbon buildup.
3. Repair & Replacement Procedures
3.1 When to Replace Jenbacher Rings
Replace rings immediately if any of the following conditions are detected:
- Visible cracks, chips, or excessive wear (ring thickness reduced by >10% of OEM spec)
- End gap exceeds maximum limit (per engine manual)
- Loss of radial tension (≥20% below OEM standard)
- Carbon fouling that cannot be removed with approved cleaning agents
- Scoring on the ring face (depth >0.02mm)
3.2 Step-by-Step Replacement Process
- Engine Preparation: Shut down the engine, isolate fuel/gas supply, and allow components to cool to ambient temperature (prevents thermal damage to new rings).
- Piston Removal: Follow Jenbacher’s OEM procedure to remove the cylinder head, connecting rod, and piston assembly. Use a piston ring compressor tool to avoid damaging the liner.
- Old Ring Removal: Use a ring expander tool (never pliers) to remove old rings from piston grooves to prevent scratching the groove walls.
- Cleaning: Remove carbon deposits from piston grooves using a groove cleaning tool (Part No. 123456) – do not use abrasive materials (e.g., wire brushes) that damage groove surfaces.
- New Ring Installation:
- Verify new rings match OEM part numbers (e.g., JEN-00123 for J416 compression rings) – never use non-genuine replacements.
- Install rings one at a time using the expander tool, ensuring the "TOP" marking faces upward (critical for oil control).
- Space ring end gaps 120° apart (compression rings) to minimize gas leakage.
- Final Checks: Confirm all rings seat properly in grooves, end gaps are within spec, and no burrs/defects exist on ring surfaces.
- Reassembly: Reinstall the piston assembly with a ring compressor, torque connecting rod bolts to Jenbacher’s specification (e.g., 180 Nm for J620), and reassemble the cylinder head.
Warning
Improper ring installation (e.g., reversed orientation, incorrect gap spacing) will cause immediate engine damage, including oil burning, compression loss, or cylinder scuffing. Always follow Jenbacher’s official service manual for your engine model.
4. Post-Maintenance Testing & Validation
After ring replacement/repair, perform these tests to ensure proper functionality:
- Compression Test: Measure cylinder compression pressure (target: 20-25 bar for J400 series) – low compression indicates poor ring sealing.
- Leak-Down Test: Check for gas leakage from the cylinder (maximum allowable leakage: 5%). High leakage points to ring/cylinder liner issues.
- Engine Break-In: Run the engine at 50% load for 2 hours to seat new rings – avoid full load during break-in to prevent premature wear.
- Oil Consumption Monitoring: Track oil usage for the first 500 hours post-repair (normal consumption: ≤0.1 L/h for J600 series). Excessive consumption indicates ring/groove misalignment.
5. Long-Term Performance Optimization
To maximize the service life of Jenbacher Rings (target: 15,000+ hours for heavy-duty operation), implement these strategies:
- Use only Jenbacher OEM lubricants (e.g., SAE 40 synthetic oil, Part No. 789012) to reduce friction and carbon buildup.
- Control gas quality: Remove contaminants (e.g., sulfur, dust) from the fuel gas to prevent ring corrosion and fouling.
- Maintain proper engine temperature (operating range: 85-95°C) – cold operation increases condensation and ring wear.
- Avoid rapid load changes: Gradual load adjustments reduce shock to the ring-liner interface.
- Document all maintenance activities (inspection dates, wear measurements, replacements) for trend analysis and predictive maintenance.
6. Troubleshooting Common Ring-Related Issues
| Issue | Root Cause | Resolution |
|---|---|---|
| Excessive oil consumption | Worn oil control rings, grooved piston grooves, or ring flutter | Replace oil control rings; machine or replace piston if grooves are worn |
| Loss of compression | Worn compression rings, excessive end gap, or cylinder liner scoring | Replace compression rings; hone or replace liner if scoring is severe |
| Ring seizure | Insufficient end gap, overheating, or lack of lubrication | Replace seized rings; check cooling system and lubrication pressure |
| Carbon fouling on rings | Poor gas quality, incomplete combustion, or excessive idling | Clean rings with approved solvent; optimize air-fuel ratio and gas filtration |