


MWM alternators are globally recognized for their robust construction, high energy conversion efficiency, and stable performance in industrial, commercial, marine, and standby power generation systems. As core components of diesel generator sets, MWM alternator parts endure continuous mechanical stress, electrical load, and environmental exposure. Proper, regular maintenance is the foundation of avoiding unexpected breakdowns, extending service life, reducing operational costs, and ensuring uninterrupted power supply.
This complete guide covers every critical aspect of MWM alternator parts maintenance, inspection, repair, replacement, and storage. It is designed for technicians, maintenance teams, facility managers, and equipment owners seeking professional, actionable best practices.
1. Core MWM Alternator Parts & Their Functional Roles
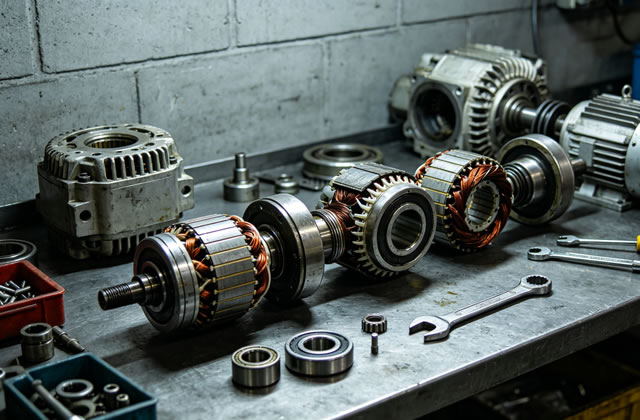
Before performing maintenance, it is critical to understand the purpose of each key component. Fault diagnosis and targeted repairs depend on clear knowledge of part functions:
- Stator Assembly: The stationary coil assembly that generates alternating current (AC) through electromagnetic induction; the main power-producing component.
- Rotor Assembly: The rotating part with field windings or permanent magnets that creates the magnetic field required for power generation.
- Bearings (Front & Rear): Support the rotor shaft, reduce friction, and ensure smooth, stable rotation at rated speed.
- Brush & Slip Ring Assembly: Transmits excitation current to the rotor windings; essential for voltage regulation.
- AVR (Automatic Voltage Regulator): Automatically adjusts output voltage to maintain stable levels under varying loads.
- End Housings & Frame: Provide structural support, protection, and heat dissipation for internal components.
- Fan & Ventilation System: Prevents overheating by circulating cooling air through the alternator interior.
- Terminal Board & Wiring Harness: Connects generated power to external loads and ensures safe electrical connections.
- Insulation Components: Prevent short circuits, electrical leakage, and damage from moisture or dust.
2. Routine Maintenance Schedule for MWM Alternator Parts
Adhering to a structured maintenance schedule is the most effective way to prevent premature part failure. Below is the industry-standard interval recommendation for MWM alternators:
Daily / 8-Hour Operation Inspection
- Check abnormal noise, vibration, or overheating during operation
- Monitor output voltage, current, and frequency stability
- Inspect for oil leaks, water leaks, or smoke emissions
- Verify cooling fan operation and air intake blockage
Weekly Maintenance
- Clean external surfaces, air filters, and ventilation grilles
- Tighten external mounting bolts and cable terminals
- Check brush pressure and slip ring wear condition
- Test AVR response and voltage regulation accuracy
Monthly / 250-Hour Service
- Measure insulation resistance between windings and ground
- Lubricate bearings if equipped with lubrication ports
- Inspect rotor and stator for dust accumulation or corrosion
- Check wiring for cracks, burns, or loose connections
Annual / 2000-Hour Overhaul
- Full disassembly and deep cleaning of all internal parts
- Bearing replacement (standard preventive maintenance)
- Brush, slip ring, and winding insulation comprehensive testing
- Dynamic balance test and electrical performance calibration
3. Detailed Inspection & Maintenance for Key MWM Alternator Parts
3.1 Stator & Rotor Windings Maintenance
Windings are the heart of the alternator. Damage directly causes power failure or unstable output.
- Use compressed air (dry, oil-free) or a soft brush to remove dust, dirt, and metal particles
- Use a megohmmeter to test insulation resistance; minimum value should exceed 1 MΩ at 25°C
- Repair or re-wrap windings if scorch marks, discoloration, or short circuits are found
- Apply high-temperature insulation varnish after cleaning to enhance protection
- Avoid moisture, oil, and chemical contamination in harsh environments
3.2 Bearing Maintenance & Replacement
Bearing failure is the leading cause of alternator mechanical breakdown.
- Listen for grinding, rattling, or squealing noises – clear signs of bearing wear
- Use genuine MWM specified lubricant; do not mix different lubricant types
- Replace bearings every 1–2 years or 2000 hours as preventive maintenance
- Ensure proper installation alignment to prevent premature failure
- Seal bearings properly to prevent dust and moisture intrusion
3.3 Brush & Slip Ring Care
- Inspect brush length; replace when worn to 1/3 of original size
- Clean slip rings with isopropyl alcohol and non-woven cloth
- Replace slip rings if deep grooves, corrosion, or uneven wear appear
- Adjust brush spring pressure to ensure even contact
- Use only OEM-specified brushes to avoid damaging slip rings
3.4 AVR (Automatic Voltage Regulator) Service
- Calibrate output voltage under no-load and full-load conditions
- Check for loose terminals, burnt components, or capacitor swelling
- Replace AVR immediately if voltage fluctuation exceeds ±5%
- Protect AVR from power surges, static electricity, and moisture
3.5 Ventilation & Cooling System
- Clean fan blades and remove debris from air passages monthly
- Replace damaged or deformed fans to maintain cooling efficiency
- Ensure operating environment temperature stays between 0°C and 40°C
4. Common Faults, Causes & Repair Solutions
Fast and accurate fault diagnosis reduces downtime and secondary damage.
4.1 No Output Voltage
- Causes: AVR failure, broken excitation circuit, damaged windings, loose brushes
- Repair: Replace AVR, reattach brushes, repair windings, re-excite the alternator
4.2 Low or Unstable Voltage
- Causes: AVR misalignment, worn brushes, loose connections, partial winding short
- Repair: Calibrate AVR, replace brushes, tighten terminals, repair windings
4.3 Excessive Vibration & Noise
- Causes: Bearing failure, unbalanced rotor, loose mounting, misalignment
- Repair: Replace bearings, re-balance rotor, tighten bolts, realign assembly
4.4 Overheating
- Causes: blocked ventilation, overloading, insulation aging, bearing friction
- Repair: Clean cooling system, reduce load, re-insulate windings, replace bearings
4.5 Oil / Water Leakage
- Causes: damaged seals, cracked housing, faulty gaskets
- Repair: replace seals, repair housing, install new gaskets
5. Genuine MWM Alternator Parts: Selection & Replacement Rules
Using counterfeit or low-quality parts will void warranties, reduce performance, and cause catastrophic failure.
- Always purchase from authorized MWM distributors or suppliers
- Verify part numbers, serial numbers, and packaging authenticity
- Replace worn parts in complete sets (e.g., both bearings together)
- Follow OEM torque specifications during assembly
- Perform full testing after part replacement to confirm normal operation
6. Long-Term Storage & Environmental Protection
Improper storage causes rust, insulation degradation, and seized bearings.
- Clean and dry the alternator completely before storage
- Coat metal surfaces with anti-rust oil and wrap with moisture-proof material
- Store in a dry, dust-free, temperature-stable environment
- Rotate the rotor shaft manually every 1–2 months to maintain bearing condition
- Re-test insulation resistance before reusing after long storage
7. Safety Protocols for MWM Alternator Maintenance
- Cut off all power sources and confirm zero voltage before operation
- Use insulated tools and wear personal protective equipment (PPE)
- Do not operate alone in high-voltage service areas
- Avoid touching rotating parts while the unit is running
- Keep flammable materials away from the alternator during testing
- Follow local electrical safety codes and manufacturer instructions
8. Conclusion: Maximize Service Life of MWM Alternator Parts
MWM alternators deliver exceptional reliability when maintained properly. The key to long-term performance lies in regular inspection, timely cleaning, accurate lubrication, prompt part replacement, and strict adherence to OEM standards.
By implementing the practices in this guide, you can significantly extend the life of your MWM alternator, minimize downtime, lower maintenance costs, and ensure stable power output in critical applications.
For complex faults or major overhauls, always contact certified MWM service professionals to ensure safe, accurate, and durable repairs.

