


MWM bearings are high-precision industrial components widely applied in heavy machinery, marine equipment, power generation systems, compressors, and large rotating equipment. They are designed to withstand extreme loads, high speeds, and harsh operating environments. However, consistent and professional maintenance is essential to maximize their service life, prevent unexpected failures, reduce downtime, and ensure operational safety and cost efficiency. This document provides a complete, step-by-step guide to MWM bearing inspection, cleaning, lubrication, repair, overhaul, and long-term preservation.
1. Core Importance of Regular MWM Bearing Maintenance
Industrial statistics show that over 40% of rotating equipment failures are caused by bearing damage, and most of these failures result from insufficient or improper maintenance. For MWM bearings, routine maintenance delivers the following critical benefits:
- Extend bearing service life by up to 60% compared to unmaintained units
- Reduce unexpected equipment shutdowns and production losses
- Lower energy consumption by minimizing friction and abnormal operation
- Protect matching components such as shafts, housings, and seals from secondary damage
- Improve overall equipment stability, accuracy, and operational safety
- Reduce long-term repair and replacement costs significantly
2. Pre-Maintenance Preparation & Safety Protocols
Before starting any maintenance or repair work on MWM bearings, strict preparation and safety measures must be followed to avoid personal injury and component damage:
2.1 Safety Requirements
- Completely shut down the equipment, cut off power, and apply lockout/tagout (LOTO) procedures
- Release all pressure in hydraulic, pneumatic, and lubrication systems
- Allow equipment to cool down to room temperature to prevent burns
- Wear protective gear: safety gloves, goggles, anti-slip shoes, and protective clothing
- Ensure the work area is well-ventilated, clean, and free of dust and moisture
2.2 Tools & Materials Preparation
- Specialized bearing pullers, induction heaters, torque wrenches, and micrometers
- Industrial cleaning solvent, lint-free cloths, soft brushes, and compressed air (clean, dry)
- Original MWM recommended lubricants and sealing materials
- Measuring tools: calipers, dial indicators, and surface roughness testers
- Replacement parts: seals, gaskets, lubrication fittings, and damaged fasteners
3. Daily & Routine Inspection of MWM Bearings
Daily inspection is the first line of defense against bearing failure. It helps detect early signs of damage and allows for timely intervention.
3.1 Visual Inspection
- Check for oil leaks, seal damage, or abnormal dust accumulation around the bearing housing
- Inspect for rust, corrosion, discoloration, or deformation on external surfaces
- Verify that all mounting bolts, clamps, and connectors are secure and properly torqued
3.2 Performance Monitoring
- Listen for abnormal noises: grinding, squeaking, rattling, or knocking sounds
- Monitor operating temperature – normal range is 40°C to 80°C; over 90°C requires immediate shutdown
- Check vibration levels using a vibration meter; sudden increases indicate internal damage
- Monitor lubrication status: ensure no contamination, oxidation, or insufficient oil volume
3.3 Recommended Inspection Intervals
- Daily: Visual check, temperature, noise, and vibration monitoring
- Weekly: Lubrication level verification and minor cleaning
- Monthly: Comprehensive external inspection and fastener torque check
- Annual: Full disassembly, inspection, cleaning, lubrication, and overhaul
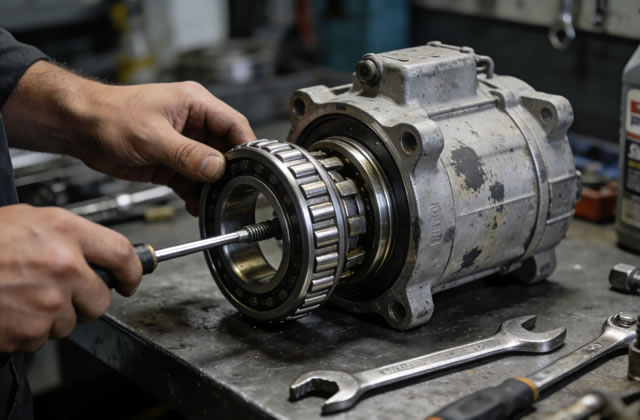
4. Professional Disassembly & Inspection of MWM Bearings
Disassembly must be performed with extreme care to avoid damaging bearings and matching components.
4.1 Standard Disassembly Steps
- Mark the orientation of the bearing, housing, and shaft for correct reassembly
- Remove external components: guards, seals, lubrication lines, and end covers
- Use a proper bearing puller to extract the bearing evenly – avoid uneven force
- For interference-fit bearings, use an induction heater to expand the inner ring gently
- Place removed bearings on a clean, lint-free cloth to avoid contamination
4.2 Comprehensive Internal Inspection
After disassembly, inspect all bearing components in detail:
- Inner and outer rings: Check for pitting, cracks, wear, scratches, or discoloration
- Rolling elements: Verify smooth surface, no deformation, no wear spots, and uniform rotation
- Cage: Inspect for cracks, deformation, looseness, or broken parts
- Shaft and housing: Check dimensional accuracy, surface roughness, and wear condition
- Seals: Replace all worn, hardened, or damaged seals to prevent lubricant leakage and contamination
5. MWM Bearing Cleaning & Degreasing Procedures
Thorough cleaning is required after disassembly to remove old lubricant, metal particles, dust, and moisture.
5.1 Approved Cleaning Methods
- Use MWM-recommended neutral or alkaline cleaning solvent – avoid corrosive chemicals
- Soak bearings in solvent for 10–15 minutes to dissolve old lubricant
- Gently scrub with a soft nylon brush; do not use metal brushes
- Flush internal gaps with clean, dry compressed air (do not spin bearings with air)
- Dry bearings completely in a clean, dust-free environment
5.2 Post-Cleaning Inspection
After cleaning, re-inspect the bearing surface for any remaining contaminants or hidden defects. Only fully cleaned and qualified bearings can proceed to lubrication and reassembly.
6. Lubrication: The Most Critical Maintenance Step for MWM Bearings
Improper lubrication is the leading cause of MWM bearing failure. Correct lubrication forms a protective oil film to reduce friction, prevent wear, dissipate heat, and resist corrosion and contamination.
6.1 Select the Right Lubricant
- Always use lubricants specified by MWM for your bearing model and application
- Choose oil or grease based on speed, load, temperature, and environmental conditions
- Never mix different brands or types of lubricants – this causes chemical degradation
6.2 Proper Lubrication Volume
- Over-lubrication causes overheating; under-lubrication causes severe wear
- Standard filling ratio: 1/3 to 1/2 of bearing internal space for high-speed units
- For low-speed, heavy-load bearings: fill 2/3 of internal space
6.3 Lubrication Replacement Cycle
- Grease-lubricated bearings: Replace every 1000–2000 operating hours
- Oil-lubricated bearings: Replace every 3–6 months or when oil deteriorates
- Harsh environments (high dust, moisture, heat): Shorten cycle by 50%
7. MWM Bearing Repair & Reconditioning Standards
Not all damaged bearings need replacement. Minor damage can be professionally repaired to restore performance.
7.1 Repairable Damages
- Superficial rust and corrosion (removable by polishing)
- Slight surface scratches (within allowable roughness range)
- Minor cage deformation (can be corrected without affecting operation)
- Small contamination particles (removable via thorough cleaning)
7.2 Non-Repairable Damages (Requires Replacement)
- Deep pitting, spalling, or peeling on raceways
- Cracks in rings, rolling elements, or cages
- Severe wear, deformation, or dimensional deviation
- Burning, blue discoloration, or material softening from overheating
- Broken cages or seized rolling elements
7.3 Professional Repair Process
- Polishing with fine abrasive tools to restore surface smoothness
- Precision alignment and cage correction
- Clearance adjustment to meet factory standards
- Re-lubrication and dynamic balance testing
8. Reassembly & Installation of MWM Bearings
Reassembly requires precision and cleanliness to ensure optimal performance and service life.
8.1 Reassembly Guidelines
- All components must be 100% clean and dry before assembly
- Apply even pressure during installation – use a mounting sleeve or hydraulic press
- Heat inner rings with an induction heater (max 120°C) for interference fits
- Follow the original orientation marks to avoid misalignment
- Install new seals and gaskets to ensure effective sealing
8.2 Post-Assembly Inspection
- Rotate the bearing manually – it should turn smoothly without jamming or noise
- Check axial and radial runout with a dial indicator
- Verify correct lubrication filling and no leakage
- Torque all fasteners to MWM-specified values
9. Commissioning & Post-Maintenance Testing
After reassembly, perform a low-load test run to confirm normal operation:
- Run equipment at low speed for 15–30 minutes
- Monitor temperature, noise, and vibration continuously
- Check for lubricant leakage and seal performance
- Gradually increase to full load and normal operating speed
- Record all parameters for future maintenance reference
10. Long-Term Storage & Preservation of MWM Bearings
For unused or standby MWM bearings, proper preservation prevents rust and damage during storage:
- Clean and coat with anti-rust oil recommended by MWM
- Seal in vacuum or anti-rust packaging
- Store in a dry, dust-free, temperature-stable environment (15–25°C)
- Avoid direct sunlight, moisture, and heavy pressure on bearings
- Inspect every 6 months and reapply anti-rust treatment if needed
11. Troubleshooting Common MWM Bearing Failures
11.1 Overheating
Causes: Insufficient lubrication, over-lubrication, contamination, misalignment, overload
Solutions: Adjust lubrication, clean bearings, check alignment, reduce load, replace seals
11.2 Abnormal Noise
Causes: Wear, pitting, cage damage, contamination, loose fit
Solutions: Inspect internal components, clean, repair or replace bearings, tighten fittings
11.3 Vibration Increase
Causes: Unbalance, shaft bending, bearing damage, foundation looseness
Solutions: Dynamic balance, check shaft condition, replace bearings, secure mounting
11.4 Lubricant Leakage
Causes: Damaged seals, over-lubrication, loose housing, pressure buildup
Solutions: Replace seals, adjust lubricant volume, tighten housing, install breathers
12. Conclusion: Best Practices for Maximum MWM Bearing Life
MWM bearings deliver exceptional performance and durability only when maintained properly. The key to long service life includes:
- Strict adherence to daily, weekly, and annual inspection schedules
- Use of original MWM-recommended lubricants and tools
- Gentle disassembly, thorough cleaning, and precision reassembly
- Timely repair of minor damage and immediate replacement of irreparable units
- Standardized record-keeping for maintenance history and performance tracking
By following this comprehensive maintenance and overhaul guide, you can achieve maximum reliability, minimize operational costs, and extend the service life of your MWM bearings to its full potential.

